As soon as you start recording TV or Radio MPEG streams regularly, you will need an editor to cut or merge MPEG files. One very important aspect is the removal of advertising blocks from recorded movies. ZapDvb integrates an editor that is simple but fast. It is indeed very fast. You will need about 10 minutes to remove 40 minutes of advertising from a movie. In other words: using ZapDvb can save you half an hour per movie! Usually background recording via atd or cron results in a single MPEG file. But you might also decide to archive capture data (foreground recording while a player is running) and in such a case you end up having a set of several small MPEG files. The editor can handle such sets as a virtual input file, that can be edited exactly like a single input file.
Probably you will end up with a collection of movies using several hundreds of GBytes. Together with the feature of background recording via cron, that allows you to automate the recording of programs like TV-series this will let you set up a Media-Server PC (containing a DVB card and disks). The editor therefore supports simple uploading of edited data to such a server (which is still not trivial for very large files). On the other end of the scale ZapDvb tries to promote the use of simple bare bone PCs as settop boxes; and the editor is simple enough for being usable in such a system.
And here comes the bad news: editing does not take
place inside a GUI; it makes use of the Linux bash shell. It is
very important to make use of the shell's history features (e.g.
you can use cursor up/down to recall commands). The video editor
even manipulates the shell history to save you some typing work!
But don't panic, you will not need to
type real shell commands. Instead the editor shell gets started
with a set of built-in commands including a friendly help.
Whenever useful the shell uses KDE dialogs (to ask questions or to
load/save files). The zapmcc program can be used
to work without KDE or to launch the editor shell from a command
window (example: do Alt-F2 and type "zapmcc
--edit").
The information in this document is informal and focuses on using the software, not on explaining how it works or on giving technical details. The MPEG editor consists of two parts, a shell script named zapdvb_cut (which is documented here) and the zapcvt program. For technical details you should read the zapcvt documentation.
This section explains how to load, edit and save a movie that was recorded via atd (e.g. a single file). In the next section you will learn about editing capture files, audio editing, uploading data to a server and handling very large files. The editor is command based although some KDE dialogs are used. Please refer to the Command Reference if you want to learn more about the available commands.
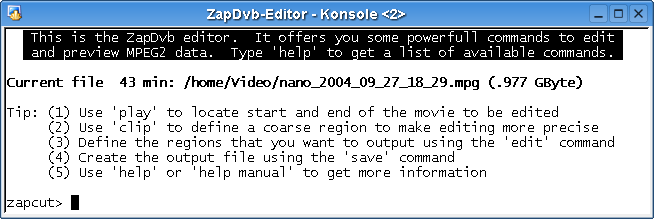
Usually a KDE Open File Dialog will pop up when you launch the editor. For now you should select a file to be edited from this dialog. After pressing the open button, you should see a window on your screen that looks like this:
At the command prompt you will enter editor commands. Play a moment with the help command to get an idea of the available commands. The editor commands can be abbreviated to a single letter or they must be typed as they are. You can also enter shell commands if you want. Try ls -lgh to see what happens.
Why is the window so small? Answer: there is no reason to make it larger and this saves room for the video preview window. Move the editor to the lower left corner of your desktop.
Why is there no scroll-bar? Answer: you won't need it! If you execute shell commands that produce long output simply use the mouse-wheel to scroll.
Why is the displayed recording length incorrect? Answer: It is only a rough estimate, see the full description of the info command.
An introductory remark: this text assumes that you have MPlayer installed and use it for editing. Other players like Xine or Kaffeine also work but some features may be missing or work differently. If you intend to use the editor frequently it is advisable to install MPlayer.
Now type play or simply p and an MPlayer window should pop up in the upper right corner of your desktop. The file that you loaded should play, deinterlacing should be turned of (this is called the preview mode). You could change these settings in the config file, but this is beyond the scope of this text.
When MPlayer is started it takes the keyboard focus - if you hit the cursor-right key, MPlayer will advance and skip a part of the video. Please read ahead before trying cursor-up or page-up to skip larger parts of the video. It is recommended to edit ~/.mplayer/input.conf to reconfigure the navigation keys, see Configurating MPlayer Navigation. For video editing only cursor-right and cursor-up make sense, other keys (like going backward) have no effect or take too long to execute (like page-up).
You have learned that you can skip parts of the input file using the keyboard. But what is the current position? Simply hit Esc (or q) which causes MPlayer to disappear and the editor prints the last position, for example: Final Position: 14.21. Like all positions that the editor uses it is given in percent of the file size (or, to be more precise, of the clipping region, see Setting a Clipping Region). In other words: values below 0 or above 100 are invalid. Play little bit with it, type something like p 5 or p 50 or p 99 and see what happens. Use the shell command history (e.g. the cursor keys) to minimise your typing work.
To find a cut position one may use several techniques. So you will probably start to play multiple short pieces of the movie using a sequence of commands like: p 5 then p 7 and p 9 and so on until you found the coarse position. Next you will use the player (and eventually cursor-right) to get a more precise position. For example you may type p 8 and when the player stops, the editor prints: Final Position: 8.62. And voila, that's it. In the first moment the procedure (an implementation of a binary search) looks odd, but after you got used to it, you will love it because it is fast!
Why is it impossible to navigate backward? Answer: the players get their input from a pipeline via stdin. To allow backward navigation they would have to buffer the data (like less does it). But currently no player has this feature. Future versions of ZapDvb will come with a tool named zapgop which will help finding cut positions directly and which will be able to navigate forward and backward.
I cannot position more precise than 400ms, is this a bug? Answer: No, the ZapDvb editor works on GOPs (Groups Of Pictures) which occur every 400ms in the input data. When you specify a position between two GOPs, the editor must advance to the next GOP.
Until this point you were using the play command, which is stateless (e.g. does not influence any settings of the editor). To remember a position you will have to use the edit command. The first argument to edit is the start position, more positions can follow, see below. You could type something like e 8.62 - (please type the minus sign for this example) to set the start position.
Even better: the edit command knows a few tricks to assist you ...
e +    # append the current "Final Position" to the list of positions
e -    # like 'e +' but replace the last list value
e      # print the current list, save edit command in shell history
Usually you will let edit play the video in preview mode by not typing the minus sign of the example given above. This makes it possible to use e instead of p when searching a cut position. You will learn more about using this feature in the next sections. Please note: if play is used without an argument it starts playing at the position given by the last position argument of the most recent edit command.
Let us assume that your recording was from a non-commercial channel and that it contains no advertisement blocks. You now might want to set a final position so that saving the result would just save the movie without anything before or behind it.
The next thing to learn is that the edit command sees its arguments as a list of pairs of values. In each pair the first value specifies the beginning of a block and the second value marks the end of that block. In the case here, you have only one single block: the movie itself. Try finding the end of the movie using the edit command trying input like e 8.62 90 or e 8.62 95 (recalling it from the shell history using cursor-up). Consider using e - if you managed to stop the player exactly at the end of the movie.
You can control the result of your work by playing the last 5 seconds of the movie by typing something like: e 8.62 20.3 . (enter a dot behind the list of positions, it navigates back 5 seconds from the last position in the edit list and then plays until the last position). If you are pleased with the result you could continue with step 6 to save the result. Otherwise continue to modify the final position editing the number until it fits.
We have discussed in step 3 how to remove a trailer that was broadcasted before the movie started. Now you will learn to remove commercial interruptions. Such blocks typically come every 20 minutes and have a typical length of eight minutes (at least in Germany this is the case). This simplifies the task of finding them. After finding the last commercial you will set the final position like learned in step 4 and then save your result.
Use the edit or play commands to locate the beginning of a commercial. Finding it's end is usually easier as the length is typically eight minutes (for a full size movie one percent roughly equal one minute, so just add 8 to the start position to get an estimate where it ends.
Your input history could look like the following (with some extra spaces to emphasis the value pairs)...
e 8.62                                                 # the movie start
e 8.62 20.3                                            # 1st commercial start
e 8.62 20.3   27.32                                    # 1st commercial end
e 8.62 20.3   27.32 51.21                              # 2nd commercial start
e 8.62 20.3   27.32 51.21   58.71                      # 2nd commercial end
e 8.62 20.3   27.32 51.21   58.71 83.5                 # 3rd commercial start
e 8.62 20.3   27.32 51.21   58.71 83.5   89.1          # 3rd commercial end
e 8.62 20.3   27.32 51.21   58.71 83.5   89.1 96.11    # the movie end
One neat feature that should be mentioned here is
how to preview the cut result - after having set the end of the 1st
commercial you could have typed: e 8.62 20.3 27.32 ..
(two dots at the end). This causes the editor to navigate to a
position 5s before the cut and then to start playing (which will
skip the commercial and continue to play behind the cut). Here
comes a summary of what you should have learned up to here...
e 8.62                # play starting at 8.62
e 8.62 20.3 .         # navigate 5s back and play until 20.3
e 8.62 20.3 27.32 ..  # navigate 5s back before 20.3 and skip commercial
e 8.62 20.3 27.32 -   # set the list but do not play anything
Saving will write a new file. You cannot override the old file, so it is better to have different folders: at least one for recoding and one for storing edited movies. To save the result one uses the save command which offers the following choices:
save                                # this shows a KDE Save File Dialog
save MyFolder                       # save in folder, use input file's name
save MyFile                         # save as MyFile.mpg (extension added)
save /home/Folder/MyFile.mpg        # explicit path
Saving will take a while for disk I/O (not for CPU time). If you have only a single disk or if input and output are on the same disk this may take five minutes for a full size movie. Things become better if you save to a server (see next section) or if you use multiple disks; maybe you can do something else with the PC while it is saving data.
I have only one disk - why does my system get very slow while saving a movie? Answer: currently Linux (kernel 2.6) has no standard way to limit disk I/O usage by a single process. So zapcvt will take all the disk I/O bandwidth of your PC to save the file. Other applications will have to wait until they get disk access.
This feature lets you define a virtual window on your input data that allows you to edit very large input files more precisely. Such a situation may arrive if you recorded more than a single movie at a time. Consider a simple example with two movies of equal size:
clip 0 60                           # clip (be sure to cover the 1st movie)
edit 2.1 85.2                       # set the edit regions like usual
save movie1                         # save the 1st movie

clip 40 100                         # clip (be sure to cover the 2nd movie)
edit 23.1 95.7                      # set the edit regions like usual
save movie2                         # save the 2nd movie
When a clipping region is set, the parameters in the edit or play commands are relative to the clipping region! Warning: clip invalidates the current edit settings.
Another good practice is using clip with a single movie to remove leading and trailing data. This is a common situation as you will typically start recording a few minutes before the scheduled begin of a movie and let the recording run 10 to 20 minutes longer for the case that some life event cause your movie to start late. Using clip on such data allows you to use edit more precisely (usually you know where the commercials are placed relative to the beginning). Warning: do not forget a leading 0 in edit if you set the start of the clipping region precisely to the start of the movie!
Here comes a complete feature and argument description of the play command. Basically it runs in one of two modes - here some examples:
# (1) playback a file in high quality mode, allowing the viewer to navigate:

play MyMovie                        # No further arguments!
play AnyFolder/MyMovie              # No further arguments!
play /AbsPath/MyMovie.mpg           # No further arguments!
play -                              # Play the currently loaded file. No further arguments!

# (2) playback in preview mode (limited forward only navigation):

play MyMovie 10                     # given file and position
play MyMovie 10 .                   # play 5" until 10%
play 10                             # current file from 'load'
play 10 3                           # play 3" from 10%
play 20 - -                         # fast play from 10%
play .                              # using 'edit' settings
play ..                             # using 'edit' settings
The syntax of the play command is:
   play [file] [position] [.|..] [time|-] [mode|-]

   file     :=   a path name, loaded file used if not given
   position :=   a position in %, last edit arg used if missing
   .        :=   play 'time' seconds until 'position'
   ..       :=   use two last edit arg, play 'time' before 2nd last
   time     :=   number of seconds to play, - to use default
   mode     :=   zapcvt mode "-d" value (1,2,3 or - for 3)
Play can also be called from the edit command:
   edit [list] .  [args]    # is short hand for:  play .  [args]
   edit [list] .. [args]    # is short hand for:  play .. [args]
   edit [list] -  [args]    # is short hand for:  play [args]
The command shows some summary information about the loaded file, the clipping region and the edit regions. Remark: DVB broadcasts can have different data rates, which currently is not taken into consideration. This is an example of the output for a single movie input file:
Current file 116 min: /home/Video/Khartoum.mpg (2.600 GByte)
View mode           : wide
Clip region   95 min: 2.9 85
Edit regions  90 min:  .8 95.9
Percent per minute  : 1.046940
The second example shows the output for a case where multiple input files are used (to edit capture data):
Current file   4 min: [virtual file, 2 segments] (.094 GByte)
View mode           : -none-
Clip region         : -none-
Edit regions        : -none-
Percent per minute  : 23.622060
Instead of giving a path name you could specify a
server location. Server locations must be configured in the
zapdvb.conf file (see below). Examples:
save action:                # use the filename from 'load'
save western:ElDorado       # explicit name given (.mpg will be appended)
Why should I use a Server? Answer: you may already have one that handles file sharing, printing, your answering machine and fax (see CapiSuite). It is a good idea to add a cheap DVB card to your server's hardware (for scheduled or periodic recording). And please don't forget to add a few large disks to have room for your growing movie archive. At the other hand you will not want to sit in front of a workstation to watch movies - built your own settop box (a simple bare bone PC with a LCD TV display). Now the settop box will become a good friend of the server!
How can I connect to a Server? The nicest way would be to use a remote file system. Linux supports at least two of them: NFS and Samba. NFS (Network File System) is almost UNIX/Linux only and won't help in a typical mixed environment. In a SOHO (Small Office, Home Office) environment one will typically use Samba (Server Message Block, SMB) - which is supported by Windows and vice versa. Another possible solution would be using FTP, but this won't work well with the usual players. The author is currently using FTP frequently to copy video data around and did even update KDE's FTP kio slave to handle large file transfers faster (since KDE 3.3).
Why is there an extra feature for server uploads? The reason is that Samba support is still broken in kernel 2.6.5 (e.g. SuSE 9.1) and does not allow you to seek or write files larger 2GBytes on shares if one uses mounting via smbfs. Attention: you can play files larger 2GBytes with MPlayer for example, but you will not be able to navigate. Don't get confused: Linux itself can handle large files, KDE mostly does, and even the smbclient program behaves correctly. Another point is the speed on a 100 MBit/s connection: by design the SMB protocol is half duplex (ping-pong) and therefore slower than ftp for example. It would be nice if we could use ftp, but ftp clients usually cannot read from stdin.
How can I configure Server
Uploads? The commands for server upload can be configured
in zapdvb.conf. Currently such a command must be
capable of reading it's input from stdin. The author uses
ssh (and does not care about the encryption
features) because ssh is typically installed on
every server. Here are some examples:
# The names must start with "server_" and continue with an arbitrary name
# (which could be a film genre). The $saveto variable will be replaced by
# the actual file name ...

server_action=ssh jpf@alpha "cat - > \"/export/Video/Action/$saveto\""
server_scifi=ssh jpf@alpha "cat - > \"/export/Video/SciFi/$saveto\""
server_trick=ssh jpf@alpha "cat - > \"/export/Video/Trick/$saveto\""
server_western=ssh jpf@alpha "cat - > \"/export/Video/Western/$saveto\""
Movies and Monitors do not always use a 4:3 aspect
ratio. See the comments and examples in the
zapdvb.conf file to learn how ZapDvb
can handle this. Usually you will predefine a set of aspects and
parameters to crop, squeeze and zoom the image. Each definition of
aspect parameters has a name and is called a view mode.
The editor can load or save the view mode from or to a
movie file. The load and save commands handle
this transparently. If the input file has no tag
information (e.g. no view mode) or if you want to do
more sophisticated things you will use the view
command:
view                         # display the current view mode
view -                       # list the predefined view modes
view wide                    # set the current view mode to 'wide'
view none                    # 'none' stands for no view mode
As stated above view modes are handled transparently. But you can also explicitly read it from the input file or even change or set the input file's view mode:
# Example: Clear the view mode and reload it from input file ...

view none                    # clear the current view mode
info                         # set info mode from input file

# Example: Change or set the view mode of an input file ...

view wide                    # set the current view mode to 'wide'
view +                       # write view mode to input file
The editor can handle MPEG1 Layer II audio files. Such files must have the extension .mp2 to let the editor recognise them as audio files. The load command can used to load such a file (set the filter to '*.mp2' if using the KDE open file dialog). All other commands work as usual (some features are disabled as they make no sense for audio). As the recommended audio player mpg123 has no user interface the editor prints a message, see the following example:
load /home/Music/audioFile.mp2     # only MPEG1 Layer II files!
play                               # play it ...
Please use Cntl-C to stop the audio player...
^C
Final Position: 3.07
The main purpose of the audio edit support is the merging of capture data (see below). The editor works only on complete audio frames and does not look into the data. This can cause click-sounds on cuts. The save command can be used to convert the output to a different format (needs sox and/or lame to be installed):
save audioOut                      # save as audioOut.mp2 (no conversion)
save mp3 song                      # save as song.mp3 (lame required)
save ogg song                      # save as song.ogg (sox required)
save ogg -                         # save as .ogg, use name from load
Capture Files are short pieces of the recorded stream data (up to 10 minutes each). Editing multiple capture files implies Merging. The load command can be used to open multiple files or a folder. In the later case a KDE selection dialog will pop up to allow you selecting the files that are to be included. Examples:
cd /home/Musik/Mitschnitt          # change current dir
load zapdvb_2004_10_08*            # load multiple files
load .                             # load folder using a KDE dialog
load /Music/folder                 # load folder using a KDE dialog
When multiple files are selected, the output of the info command looks like the following:
Current file  29 min: [virtual file, 4 segments] (.041 GByte)
View mode           : -none-
Clip region         : -none-
Edit regions        : -none-
Percent per minute  : 3.4305300
The editor handles the files as if they had been concatenated to a single (virtual) input file. All commands can be used as if a single (real) file had been loaded. You have seen that Merging occurs on load. The save command implements Splitting through one or two extra arguments. Examples:
save myFile                        # save to myFile.mpg
save split myFile                  # save 2GByte chunks named like myFile000.mpg
save split -                       # save 2GByte chunks, use name from 'load'
save split 512 -                   # split into chunks of 512 MByte
ZapDvb helps you to organise your recordings and to avoid that the disk fills up too early by providing some special folders. These folders get inspected by a daily cron job that deletes data from these folders after a time specified in the configuration file (see comments there for details). You can configure the folder names and you can choose the layout (e.g. you could use the same folder for Video and Music if you want). The recommended layout is:
 /mnt/dvbdata    # Using a partition as root would be nice. This prevents system
                 # failures from a disk filled up with video recorded via cron.

     video                    # ** the home of video data
         archive              #    for archiving your videos
         capture              # ** foreground recordings are stored here
         trash                # ** the save command can use this
     music                    # ** the home of audio data
         archive              #    for archiving your audio tracks
         capture              # ** foreground recordings are stored here
         trash                # ** the save command can use this

 # only folders marked with ** are cleaned by the cron job (homes, capture, trash).
By default data from background recording (via atd and cron) goes to the home directories (video or music in the above example). Data from foreground recording (e.g. capture) goes to a special capture folder. When you save an edited file, the original file gets moved to a trash folder. You can have as many extra folders as you like, but these will not be touched by the cron job (see archive in the example).
With the exception of the trash folder, the cron
job deletes only files that have names following a pattern like
2004_10_01_11_33.mpg (e.g. files that were
automatically created from cron or capture
recording). Also only files the have the extensions
.mpg, .mp2, .mp3
or .ogg will be deleted. In the trash folder the
file name pattern does not matter and the save command has
an extra configuration parameter to limit the number of files in
this folder can contain.
The editor commands are nothing but bash macros.
They exchange state by some shell variables that have the name
prefix 'ZAPCUT_' and which you should not modify directly. Use the
shell history (cursor up/down) to run commands and be aware that
edit + and edit - add entries to the
shell history.
The macros used here can shadow some linux
commands. To call such a command find out the path by typing
which -a <cmd> where <cmd> is
the command name. Then enter the full path to execute the command.
Example:
   which -a info        # display the path of info
   /usr/bin/info bash   # run the GNU info command
By default the navigation keys of MPlayer use too
large increments for the purpose of ZapDvb. These
lines could be in your input.conf to fix this
problem:
# lines from ~/.mplayer/input.conf ...
RIGHT seek +3
LEFT seek -3
DOWN seek -20
UP seek +20
PGUP seek +100
PGDWN seek -100
The built-in editor commands are:
| startposition | sets the start of the clipping region (in percent) relative to the size of the input file |
| endposition | [optional] if this parameter is used it sets the end of the clipping region, otherwise the region extends to the end of file |
| position | [optional] The positional arguments are relative to the clipping region and are measured in percent (e.g. values must be in the range 0 ... 100). They should be in an ascending order to be useful. |
| . | [optional] Check final position: starts playing 5 seconds before the position given by the last position argument and stops when the last position is reached. |
| .. | [optional] Check removed block: starts playing 5 seconds before the 2nd latest position, skips the intermediate data and continues playing at the position given by the last position argument. |
| - | [optional] Check start of block: starts playing at the position given by the last position argument. |
| time | [optional] Overrides the time in seconds that the player should go back (instead of the 5 seconds default) or limits the time to play from the last position. |
| mode | [optional] Changes the display mode, possible values are 1 (high quality), 2 (preview mode, default) and 3 (fast play, MPlayer only). A minus sign is accepted as a synonym for 3. |
| subject | [optional] a help topic, run help without arguments to get a list of possible values. |
| pos | [optional] The start position (default is the last value from edit position list) |
| . | [optional] Play a few seconds until the start position is reached (see time). |
| .. | [optional] Show the last cut (needs two or more positions in the edit list). Example: p .. |
| time | [optional] Amount of time in [s] that . or .. will play. |
| speed | [optional] Play in fast mode (if player supports it). Example: p . - + |
| split | [optional] Split the output into small files (default size is 2047 MByte but can be overridden by a numeric value. Example: split 512). |
| server | [optional] Sends the output to a server (see:
zapdvb.conf) instead of the local file-system. |
| file | [optional] The filename to be used (default is the name of the input file). If no extension is given .mpg or .mp2 are automatically appended. |
| mp3 | [optional] Audio: convert to mp3 format (lame must be installed) |
| ogg | [optional] Audio: convert to ogg format (sox must be installed) |
| file | [optional] The filename to be used (default is the name of the input file). If no extension is given .mp2 or .mp3 or .ogg are automatically appended. |
zapdvb.conf)| - | Lists the predefined view modes (see:
zapdvb.conf) |
| + | Sets or clears the view modes of the input file. |
| none | Special keyword to clear the current view mode. The info command would set it again if used for an input file having a save view mode. |
| name | Sets name as the current view mode. |