Do a little Test, Read more
Documentation, Configure
At this point you should already have configured
the technical aspects (see the README
files). Make sure that if you open a console and type something
like
artsshell -q autosuspend 2
zapdvb -n1
your video player starts and plays the TV channel.
Even sound should work - if the zapdvb program
seems to hang KDE's sound daemon (arts) may be misconfigured.
A Note for GNOME Users:
currently there is no real support for GNOME. Even if you have KDE
and GNOME installed, running the kdialog based UI will not be a
friendly experience. You could try the console interface
instead.
A Note for Console Mode
Users: if the DISPLAY environment variable
is not set all zapdvb programs (including the UI)
work in console mode. If you have a running X server but no KDE
installation please try to call zapmcc with the
--cmd option.
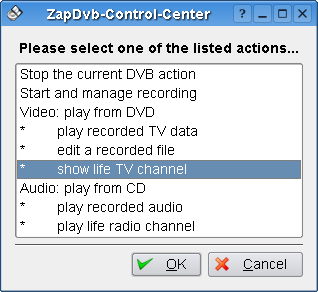
Usually the GUI gets started if you type
zapmcc at the console prompt. If you
have KDE running the simple "KDE via kdialog" implementation
should present the main dialog:
If you did not run setup to create some folders for video
and audio data or if you did not edit your zapdvb.conf
your will get an error message telling you what is missing.
After you have fixed the problems the simple GUI should work for
you but some features may still be disabled, it looks ugly and it
is not very confortable. In the following text you will learn how
to get something better...
As a KDE user you will soon like to add the ZapDvb
Media-Control-Center Menu (in Multimedia)
to your Task-Bar and to add some keyboard shortcuts (see KHotKeys
and the example file data/kde_config_khotkeysrc). |
 |
To get more features or a nicer GUI you will have
to modify your zapdvb.conf, to make LIRC work (for
infrared remote controls) or to customize KDE.
Concept: Making the User Interface (GUI)
Pluggable
Often applications are GUI centric or depend on a
specific environment like KDE or Gnome (and both depend on X11).
ZapDvb avoids this. The logic for a user interface
is implemented in an abstract way (see zapdvb_gui). It
can be used by various implementations. Examples are:
| KDE via kdialog |
This is a very simple UI, there are only a few list- and input
dialogs. Is requires nothing but a minimal KDE installation.
Unfortunately this technique is slow as each dialog window is shown
by a separately lauched kde program (kdialog).
This is the default setting. The
implementation file is zapmcc_kd3. |
| KDE via kjscmd |
Still a simple UI with slightly more features. Is looks better
and is much faster than its kdialog based sibbling. It uses the
kjscmd javascript engine that comes with KDE - but which might be a
separate package that needs to be installed (Debian:
kjscmd). You must edit your
zapdvb.conf to enable this style. The
implementation file is zapmcc_kj3. |
| Console Mode |
Currently this serves as a demonstration that ZapDvb does not
depend on KDE or even X11. When your system has a frame-buffer
console (which is very common) and if you have
MPlayer installed, you will be able to watch TV or
to play recorded video in console mode. The implementation file is
zapmcc_kd3. |
Future versions of this software will provide more
UI implementations. The following table shows how the things fit
together (for the kjscmd example):
| Layer |
Purpose |
Actions |
zapmcc |
This is the application launcher and is
the only way to start the UI. The command has a number of
command line options like playing a tv or radio channel or to enter
a specific state. If another instance is already running, the
command gets forewarded to that instance. This is how keyboard
shortcuts can be configured (see
data/kde_config_khotkeysrc, an example configuration
file for KDE's hotkey daemon). |
1. check the environment
2. load the configuration
3. load the I18N file
4. start LIRC
5. load a UI implementation
6. start zapdvb_gui |
zapmcc_kj3 |
Provides the concrete UI. This
implementation works as a server, it waits for requests to display
UI elements and signals user actions. It may use some small helper
tools (like wmctrl) to fullfill its task. Important: on this layer
the software knows nothing about zapdvb, zapcvt or any
players. |
1. launch kjscmd
2. enter GUI server mode |
zapdvb_gui |
This is the abstract UI logic. It
is one process (from the original zapmcc invokation) that stays
alife until the user quits the application. It follows a state
model and is driven by user input. Important: it is on this layer
where the software knows about zapdvb, zapcvt and players. |
1. build the menues
2. handle user actions
3. use the UI implementation
4. start players or tools
|
Concept: Support for Remote Controls
(LIRC) and Keyboard
bla
Concepts: Using the Desktop or Set-Top Box
Mode
The two modes mentioned above refer to two very
distinct scenarios of using ZapDvb interactively.
This lead to the implementation two slightly different GUI
behaviours:
Scenario 1: In
traditional desktop applications you will use the
mouse and the keyboard to enter
data and to trigger actions. Usually such applications offer a very
fat GUI - there are many widgets of different types that you can
click on. It is not uncommon that such applications cannot be fully
controlled from a keyboard alone, you will always depend on two
input devices. ZapDvb does not come with such a
fat GUI, but the following text will explain how to configure KDE
to make ZapDvb comfortable on the desktop.
Scenario 2: Keyboard
and mouse require that you take a fixed position in respect to
them, so even a (wireless) keyboard with integrated mouse pad wan't
help very much unless you sit in front of table. With a set-top box
installation you will prefer to use LIRC (Linux
Infrared Remote Control) giving you the freedom to use it from your
sofa or rocking chair. Although LIRC and ZapDvb support a mouse
emulation you will not like very much to depend on mouse actions.
Also the Remote Control may have a very limited number of buttons
and these buttons can be quite small. The second part of this text
describes how ZapDvb can help here.
Introduction to the KDE Integration
ZapDvb has a simple builtin
support for KDE which is using kdialog. Despite of being a bit
simple this has the advantage to run everywhere just out of the
box. These dialogs are described in the third part of this text.
This part provides information on how to make it easier to use and
to give it a nice apearance.
Using KDE Menues and Hotkeys ...
The infrastructure for LIRC can also be used by
KDE's built in mechanisms to provide additional user interfaces.
The default installation of ZapDvb already creates
menu entries in the Multimedia sub menu of the KDE start menu.
While this uses the mouse as input device the second interface uses
the keyboard via hotkeys (you will have to copy a file). Here are
the details...
As a first step you can add
the ZapDvb menu to the task bar (kicker). This takes the
following steps:
- Right-click on the task bar KDE menu icon
- Select the "Panel Menu" entry
- Select the "Add" entry
- Select the "Application Button" entry
- Select the "Multimedia" entry
- Select the "ZapDvb" entry
- Select the "Add This Menu" entry
As a second step you can configure the KHotKeys daemon. There are two ways to
do so:
cd /usr/local/share/zapdvb/data
cp kde_config_khotkeysrc ~/.kde/share/config/khotkeysrc
Alternately you can try to import this file via
the KDE Control-Center KHotKeys applet. To do so open the applet
(see under "Regional & Accessibility"). Switch to the "General
Settings" tab and click on "Import New Actions ...". In the file
dialog change the filter to kde* and navigate to the
/usr/local/share/zapdvb/data folder. Open the
khtkeysrc file.
Here is a table of predefined hotkeys, the
corresponding LIRC actions and a textual description. Please take
the predefined Menues and hotkeys just as a starting point for your
own experiments and not as a final wisdom.
| Keyboard |
LIRC Action |
Description |
| These keys have effect if ZapDvb is running but do
not start ZapDvb... |
| Win+Return |
ok |
Confirm a dialog |
| Win+Del |
cancel |
Dismiss a dialog, cancel a player |
| Win+M |
main |
Show the main menu |
| Win+X |
more |
Show the context dependent extra menu |
| Win+Q |
quit |
Stop ZapDvb immedeately, don't ask a question |
| Win+Page_Up |
prev |
Move to the previous entry |
| Win+Page_Down |
next |
Move to the next entry |
| Win+Pos1 |
top |
Move to the first entry, zap to previous channel |
| Win+End |
bottom |
Move to the last entry, zap to next channel |
| Win+Insert |
show |
Cycle through active windows changing the input focus |
| These keys are passed to zapmcc and optionally
start ZapDvb... |
| Win+R |
radio |
|
| Win+A |
audio |
|
| Win+C |
cd |
|
| Win+T |
tv |
|
| Win+V |
video |
|
| Win+D |
dvd |
|
| Win+E |
edit |
|
| Win+J |
jobs |
|
| These keys can be configured via
zapdvb.conf... |
| Win+1 |
exec1 |
|
| ... |
... |
... |
| Win+9 |
exec9 |
|
Customizing the Window Layout ...
Customizing the Colour Schema ...
Documentation to be written...
- LIRC Integration
- KDE: Problems with kdialog
- KDE: Keyboard shortcuts via zapmcc
- KDE: Settop box mode Considerations
- KDE: Advanced settings (../config/kwinrules)
GUI Plans
The GUI will be improved in future releases but
working on it has low priority! Currently this is all you can
get...
- Allow Replacements for kdialog (for Gnome)
- LIRC Integration
- Interface for pluggable GUI-Servers
- Command-Line GUI-Server with ncurses (uses mplayer frame buffer
support)
- KDE ECMA Script GUI-Server
The Main Menu
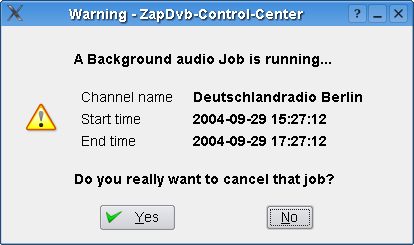
- Stop the current DVB action
- This entry is only shown if a player or a background job is
running. If you select it, a foreground job would be terminated
immediately without prompting. If a background job is running a
dialog pops up, see Terminating a Background
Job.
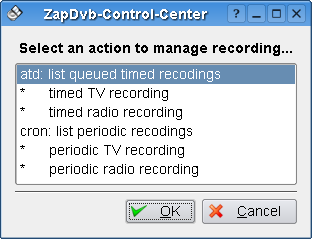
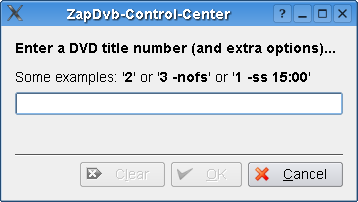
- Start and Manage Recording
- .
- Video: Play from DVD
- .
- Video: Play recorded TV data
- .
- Video: Edit a recorded file
- .
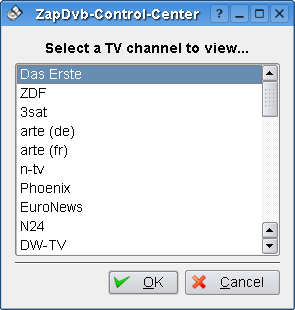
- Video: Show life TV channel
- .
A Channel List
Start and Manage Recording